
We like to play a drinking game whenever we watch a show on HGTV – you have to take a sip anytime someone says “open concept”. This game can get you very drunk, very fast. Because “open concept” is all the rage in real estate, but it has one fatal flaw – if everyone can see your kitchen from all the other rooms in your house, then they can also see your giant pile of dirty dishes from cooking!
After remodeling our kitchen last year, we too have an open concept first floor, and this has somewhat changed the way I plan menus for entertaining. Without the option of hiding my cutting boards, mixing bowls, and multiple utensils away from guest eyes in a closed-off prep space, I now attempt to do as much cooking — and clean-up — before guests ever arrive.
With the “big game” (you know which one…the one that will sue you for copyright infringement if you say their name on a lowly blog) this weekend, I thought I’d share three of the make-ahead appetizers I’ll be serving, so that you too can serve up both great snacks and a perfectly-clean kitchen.
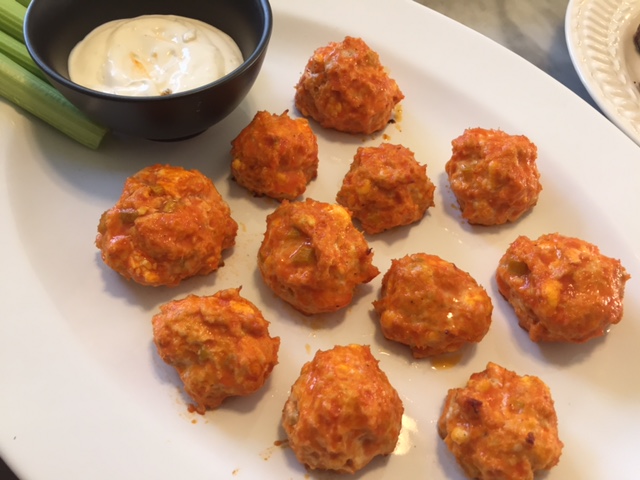
Buffalo Bites
This recipe is adapted from one I found on a Paleo/Gluten-free blog I stumbled across recently. Not being Paleo or gluten-free myself, I’ve adapted it to make the balls a bit easier to assemble and in order to make a larger batch. This makes 24-30 bites.
Ingredients:
- 2 lbs ground chicken
- 4 oz cream cheese, softened
- 1 egg
- 2 stalks chopped celery
- 1 tbsp chopped green onion
- 1/2 cup crumbled blue cheese
- 1/2 cup plain bread crumbs
- 1 tsp black pepper
Directions:
Combine all ingredients in a large mixing bowl, using your hands to incorporate everything together. Then, form roughly 1-inch balls and place them on a greased cookie sheet.
At this point – if you’re making ahead, cover with plastic wrap and store in your refrigerator for up to 24 hours.
Once you’re ready to serve, place the cookie sheet in a 350 degree oven for 10 minutes. Then, remove the balls and gently dredge them in your favorite wing-sauce, then return them to the baking sheet and cook for an additional 12 minutes. Repeat dredging in wing sauce and cooking for another 12 minutes.
Serve with blue cheese or ranch dressing and celery sticks. Stick the cookie sheet and the small dredging bowl in an empty waiting dishwasher, and you’ve got a great snack with no leftover mess!
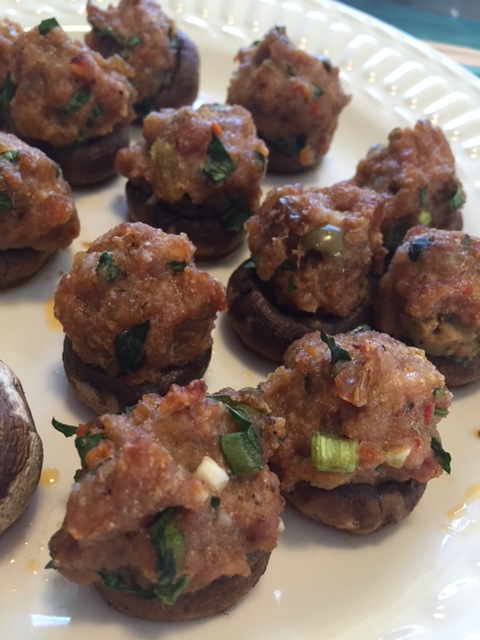
Kitchen-sink stuffed mushrooms
These are a huge crowd pleaser. Once again adapted from another recipe, I call these kitchen-sink mushrooms because you can basically thrown in everything plus the kitchen sink. The key is to balance salty + sweet + tangy and you get a great final product. Makes about 60 mushrooms — if you don’t need that many, just freeze whatever portion of the stuffing you don’t use, and you’ve got a great start on your next dinner party.
Ingredients:
- 1 lb “hot” ground italian sausage (if you can’t find hot, then plan to add 1 tsp black pepper and 1/2 tsp red pepper flakes)
- 1/2 cup grated parmesan cheese
- 10 pimento-stuffed-green olives, chopped
- 1 large handful fresh parsley, chopped
- 1 tbsp dried oregano
- 1/4 cup plain bread crumbs
- 1 tbsp chopped green onions (or, replace with sauteed shallots is good too!)
- 1/4 cup chopped golden raisins
- 3 cloves finely chopped garlic
- 1 tbsp Worcestershire sauce
- 1 tsp black pepper
- 1/2 cup olive oil (+ more to drizzle on mushrooms)
- Salt & pepper to flavor the mushrooms
Directions:
Remove the mushroom stems and gills and discard. Clean the caps with a dry paper towel (or a mushroom brush, if you’re fancy). Place them open-side-up on an oiled cookie tray, and drizzle 2-3 drops of olive oil in each cap. Season caps with salt and pepper, then set aside.
Combine all the remaining ingredients in a large mixing bowl, using your hands to fully incorporate. You’re looking for a consistency like cookie dough – if it’s too dry, add more oil, if it’s too wet, add more bread crumbs.
Next, put a heaping portion of the stuffing mix inside each mushroom cap and smooth down the top. Now – if you’re making ahead, simply cover the cookie sheet with plastic wrap and stick these in the fridge until gametime.
Whenever you’re ready to cook, remove the plastic wrap and place the cookie sheet in a 350-degree oven for 20 minutes. Remove from oven, let cool for 5 minutes, and then serve.

Dip in a Bread Bowl
This one’s the easiest of all, and ultra-customizable. You can use any dip you want, though I prefer HEB’s “Love Dip” I’ve also served this with spinach-artichoke dip, bacon-cheese dip, or fiesta ranch dip.
Ingredients:
- Your dip of choice
- 1 Loaf French-country bread
- Olive Oil
- Salt and Pepper
Directions:
Using a serrated knife, cut the top (about 1/4 of the way down) off the bread. Place the top to the side, you’ll use it later. Then, using a serrated paring knife, cut down along the inside of the bread, removing roughly 75% of the “insides”.
For the bread sections that you removed, cut into 1-inch cubed sections, and arrange on a cookie sheet. Drizzle lightly with olive oil, salt, and pepper. For the bowl, brush olive oil along the outside of the loaf and the new inside section, then sprinkle with salt and pepper, before placing on the cookie sheet along with the other pieces.
Pop it in a 350-degree oven for five minutes until it is a nice golden brown. At this point, the “bowl” is finished, and you can wrap it in paper until you are ready to use. Place the bread pieces in a large ziploc bag so that they won’t dry out.
When you’re guests are imminent, arrange your bread bowl in the center of your serving tray, surrounded by the bread pieces and (if you wish) crudite. Spoon your chosen dip mix into the bread bowl, and you have a fancy way to present an old classic.