 This spring we decided to do a little spring garage cleaning in order to fund some hobbies/projects we’d been wanting long term. I sold our big, old wine fridge that we never used on Craigslist for $400 and put that money towards building a wicking, raised bed vegetable garden in our front yard. And it turned out great!
If you’re not familiar, there are numerous benefits to gardening in a raised bed versus a traditional in-ground garden. First, you can control the soil quality (since you bring in your own soil) and can choose something with the right PH for the plants you’re actually growing. Secondly, the raised beds are easier to work – you don’t have to be on your hands and knees, stooped over the ground to do your gardening tasks. Third, you don’t have to weed as often, since you have a barrier between your bed and the ground.
Even better than just a raised bed garden, however, is the wicking raised bed garden. Imagine putting the end of a paper towel in a cup of water – see how the water will “wick” up the part of the paper towel that isn’t in the cup? By putting a reservoir of water at the bottom of the raised bed and soil on top of the reservoir, the water is absorbed into the soil slowly through this same principle. Building a raised bed in this way allows you to water your plants less frequently, improves drainage, and helps to avoid overwatering.
That being said, building this type of garden bed does require a bit of investment. Our cost broke down like this:
- $202.49 – Materials & Supplies
- $90.38 – Gravel/Rocks
- $109.99 – Dirt & Compost
TOTAL: $402.86 –> That’s pretty darn close to our projected budget! However, if you were able to use reclaimed materials, you could probably get the cost down a lot more.
So how do build one, already? (Click “read more” for step by step instructions.)
1. Determine the size you want for your garden, and pick a spot in your yard where it will go. Using a shovel, level out that spot by raising or leveling the ground as needed. If there was grass or other ground covering, till it under.
2. Build your box. We went with a 4′ x 8′ x 2′ bed, using cedar 2″x6″ boards. Cedar provides natural protection against bugs and rot. There’s some debate as to whether the chemicals in treated lumber may leach into the soil, so if organic is important to you, choose cedar instead.
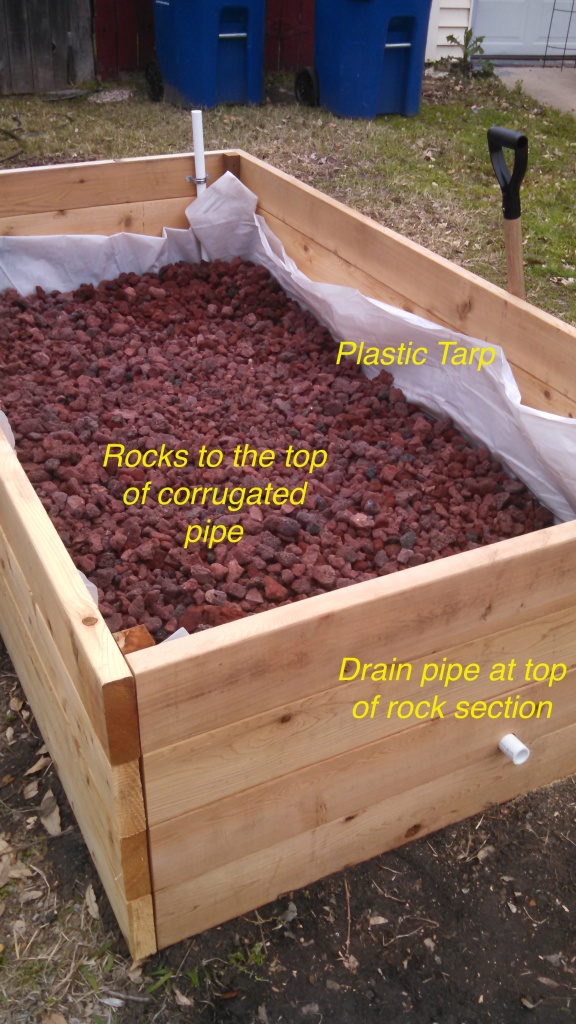
3. Line the bottom of your box with plastic or a tarp – this should be a non-permeable material, so that weeds can’t get through and so that the water going into your box doesn’t leak out.
4. Get a corrugated drain pipe with holes pre-drilled in it – this will serve as your watering mechanism. Put caps on both sides. Cut a 1″ hole in one side of the cap, and put a 1″ PVC elbow, attached to a 1″ PVC pipe that is at least as tall as the height of your box. Clamp the PVC pipe onto the side of your box, and spread the corrugated drain pipe throughout the bottom of your box, evenly spaced. (I forgot to take a picture of this step, but check out this version for the same concept.
5. Add in rocks or gravel to your reservoir, just until they start to cover the top of the corrugated drain pipe. We used a red lava rock for this because it was cheapest – any rock, gravel, or sand will do though. I saw one video in which someone used recycled, tumbled glass. Mainly you’re just filling up your reservoir partially so it doesn’t require as much water to fill it.
6. At the very top of your rock section, add a drain pipe using 1″ PVC, and cut a hole in the box for it to drain through. This drain pipe will tell you when to stop watering and will also provide emergency drainage in case of heavy rains. This is also a good time to add on any “extras” you may want – we added pvc holders so I can add garden stakes and cover the vegetables in netting. Other people add seats along the top. Your call.
7. Cover your reservoir with a permeable fabric, like landscapers cloth. (Burlap or cotton would work too, if you have any lying around). This will help encourage the wicking, and keep soil out of your reservoir.
8. Add in your soil, layering top soil with compost, fertilizer, peat, etc., to get your desired soil quality. You only want your soil section to be about 12″ tall – much taller and the water won’t be able to wick all the way to the top.
9. Test it out – attach your hose to your reservoir, and make sure you’re not seeing any leaks or pooling. Once water starts to run out of your drain pipe, your reservoir is full.
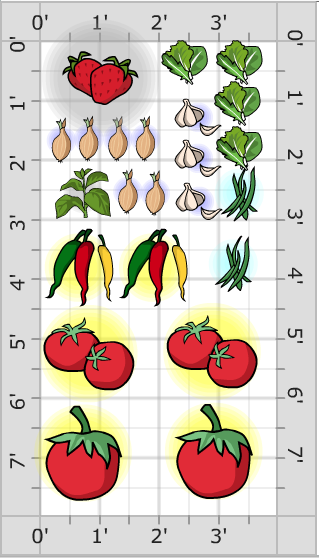
10. Add your vegetables! I like the garden planner tool at Mother Earth News to help determine spacing, as well as the month-by-month planting guide at Natural Gardener.
We put in tomatoes, peppers, pole beans, shallots, garlic, lettuces, basil, and strawberries for our first go round. In a couple months, we’ll pull the strawberries, and cantaloupe will go in its place. Good luck – tell me how your gardens are doing this year as well.


